How to Draw a Turtle Shell
Did you know that turtles belong to one of the oldest reptile groups in the world—beating snakes, crocodiles, and alligators? The first proto-turtles are believed to have existed about 220 million years ago!
Drawing a turtle is a great experience for artists of any skill level. Using the example of this animal, we can observe a variety of textures and natural patterns.
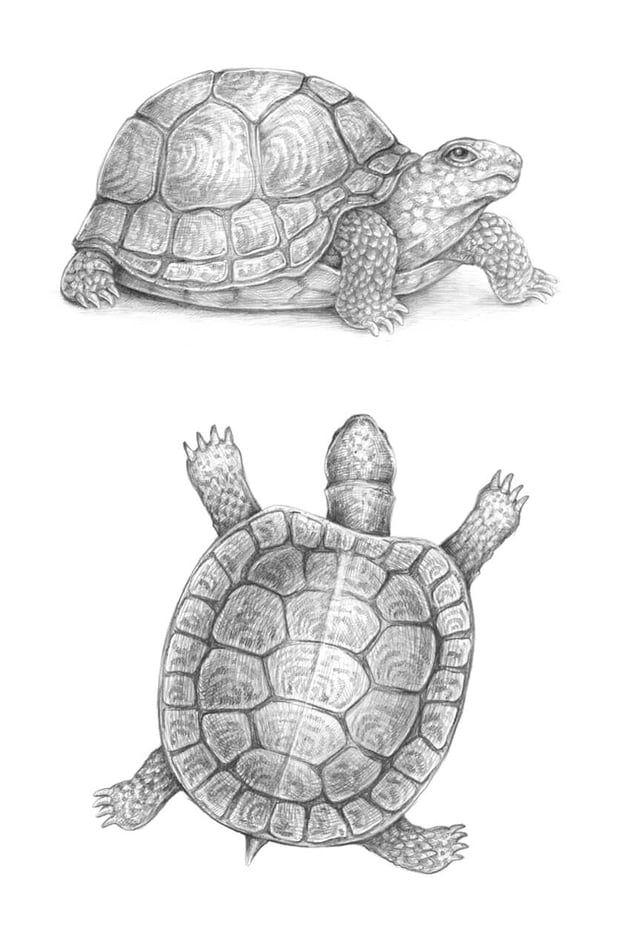
We'll sketch a turtle from scratch, both in a side and aerial view, using just a couple of graphite pencils. Let's have fun!
What You Will Need
- an HB graphite pencil
- a 3B graphite pencil
- an eraser
- drawing paper


1. How to Draw a Turtle in a Side View
Step 1
Let's start with a rough sketch of the turtle's figure.
I draw a rounded shape of the shell. Most land-based turtles have a large, heavy, dome-shaped shell that protects the animal's body from predators.
The shell is actually a part of the skeleton; it consists of over 50 bones. And, contrary to a popular belief, a turtle cannot come out of its shell.


Then I add the shape of the head…


… and mark the feet—or, more precisely, the places where the limbs meet the ground. We don't add the fourth shape because it is not visible in this foreshortening.


Step 2
I refine the initial shape, outlining the upper shell of the turtle (it is called the carapace).
A shell is a three-dimensional object, so I round the contour line in the bottom part of the shape.


Then I add the plastron—the lower shell that encases the belly.


Step 3
I outline the shape of the head.


Step 4
I draw the eye. Most terrestrial turtles have their eyes looking down at objects in front of them, so my intention is to convey this feature by lowering the eye's inner corner.


Step 5
I draw the line of the mouth. Turtles have rigid beaks that help them to bite off pieces of food.
I also add the nostrils.


Step 6
Using simple shapes, I construct the short, sturdy feet of the turtle.


Step 7
I refine the feet, erasing all the unnecessary lines.


Step 8
Turtles usually have long claws, so I add four claws to each limb. The feet look much more credible now!
I also refine the shape of the carapace.


Step 9
I draw the prominent polygonal plates (they are called the scutes) in the upper part of the carapace.


I add the next row of scutes just underneath the first one.


Step 10
I add two more rows; the scutes here are smaller.


I also mark the relief elements of the plastron with light lines; we don't need too many details here.


Step 11
Let's add some details to the turtle's skin. The pattern may vary; you can see a couple of examples in the image below.


I add the elements, starting from the head. I also draw the folds of skin in the neck area.


Step 12
I complete the pattern in the head and neck area.
Then I add the pattern of the turtle's limbs; it resembles a set of close-fitting jags of slightly different size.


Step 13
I draw the pattern of the scutes. You can see an example scheme in the image below.
By the way, counting the rings formed by the stack of smaller, older scutes on top of the larger, newer ones can help to estimate the approximate age of a turtle.


Step 14
With the HB pencil, I add some shading to the darkest areas of my drawing, including the drop shadow.


Step 15
I also add a layer of light hatching to the sides of the shell and the head of the turtle.


Step 16
With the 3B pencil, I emphasize the pattern of the scutes.


Step 17
With the 3B pencil, I increase the contrast in the drawing by darkening the skin texture.


Step 18
With the 3B pencil, I cover the shell with a layer of hatching, accentuating the sides and the gaps between the scutes.


Step 19
To make this drawing harmonious, I apply more 3B graphite strokes to the limbs and head.
This illustration is complete!


2.How to Draw a Turtle in an Aerial View
Step 1
I draw a light line with the HB pencil; let's assume that this line is going through the center of the turtle's head and shell.


I add the shape of the shell and the framework of the limbs.
This reference is not a strict guideline, it's rather a general outline that helps us to convey the direction of the body.


Step 2
I draw the shape of the head with the neck, and then add the feet.


Step 3
I refine the shape of the neck. Turtles often have a traverse skinfold that is visible in this foreshortening.


I narrow the shape of the head and add the eyes—they are barely visible.


Step 4
I construct the limbs.


Step 5
To complete the feet, I add the claws.


Step 6
I draw a short tail; most species of turtles have it.


Step 7
I draw a new rounded shape inside the shell outline, and then divide it into three parts.


Step 8
I draw the scutes in the central part of the shell. Allow the elements to be slightly uneven—this makes the drawing more natural.


I add the circular row of smaller scutes.


Step 9
I create a pattern of scutes. Don't strive for perfection; let the pattern be slightly irregular and spontaneous.


Step 10
I add the jagged pattern of the limbs.


Step 11
With the HB pencil, I accentuate the darkest areas of the drawing.


Step 12
With the 3B pencil, I increase the contrast, darkening the pattern of the scutes and the gaps between the plates.


Step 13
I apply a layer of hatching to the shell, using the 3B pencil. I also work on the textures of the turtle's limbs, head, and tail.


Step 14
With the 3B pencil, I darken the shell, leaving its center relatively light to create an illusion of convexity. I also accentuate the shadows on the limbs and neck.


Your Artworks Are Complete
Congratulations—we've created two beautiful graphite pencil drawings! I hope you were inspired by the fascinating textures and the world of nature.
Let your creative journey be fruitful and full of joy!


donaldsonmostright.blogspot.com
Source: https://design.tutsplus.com/tutorials/how-to-draw-a-turtle--cms-30517
Post a Comment for "How to Draw a Turtle Shell"